Welcome to the ultimate 3D furniture rendering guide by 4dviz Studio. This guide explains every step of our process — from onboarding to final delivery — so you know exactly what to expect when working with a professional rendering studio.
Let’s dive into the step-by-step process that transforms your concept into pixel-perfect visuals.
Step 1: Understanding Your Needs (Client Onboarding)
Every successful project begins with clear communication. Our onboarding process is focused on understanding:
- Your brand and product goals
- The intended use of the visuals (e.g., eCommerce, print catalog, social media, AR)
- Your expectations in terms of quality, style, and deadline
What we’ll ask you to provide:
- Reference images or sketches
- CAD files or technical drawings (if available)
- Material and finish details (e.g., wood type, fabric swatches)
- Preferred angles or camera views
- Any brand guidelines or inspiration images
You’ll get a brief form or a short call with us to align expectations upfront. This helps us quote accurately and avoid surprises later.
Step 2: Quotation and Timeline Proposal
Based on your input, we provide a detailed project estimate and timeline. Our pricing is broken down clearly—whether you’re paying per model, per render, or for a bundle of products.
Here’s what we cover in the proposal:
- Scope of work (number of models, views, environments)
- Cost per unit/item/view
- Turnaround times for drafts and final delivery
- Revision policy
- Deliverables and formats (e.g., JPG, PNG, GLB, FBX, or native files)
Once you approve the quote, we lock the delivery dates and begin production.
Looking for pricing information? Check out our 3D Furniture Rendering Cost Guide for a detailed breakdown of costs and pricing factors.
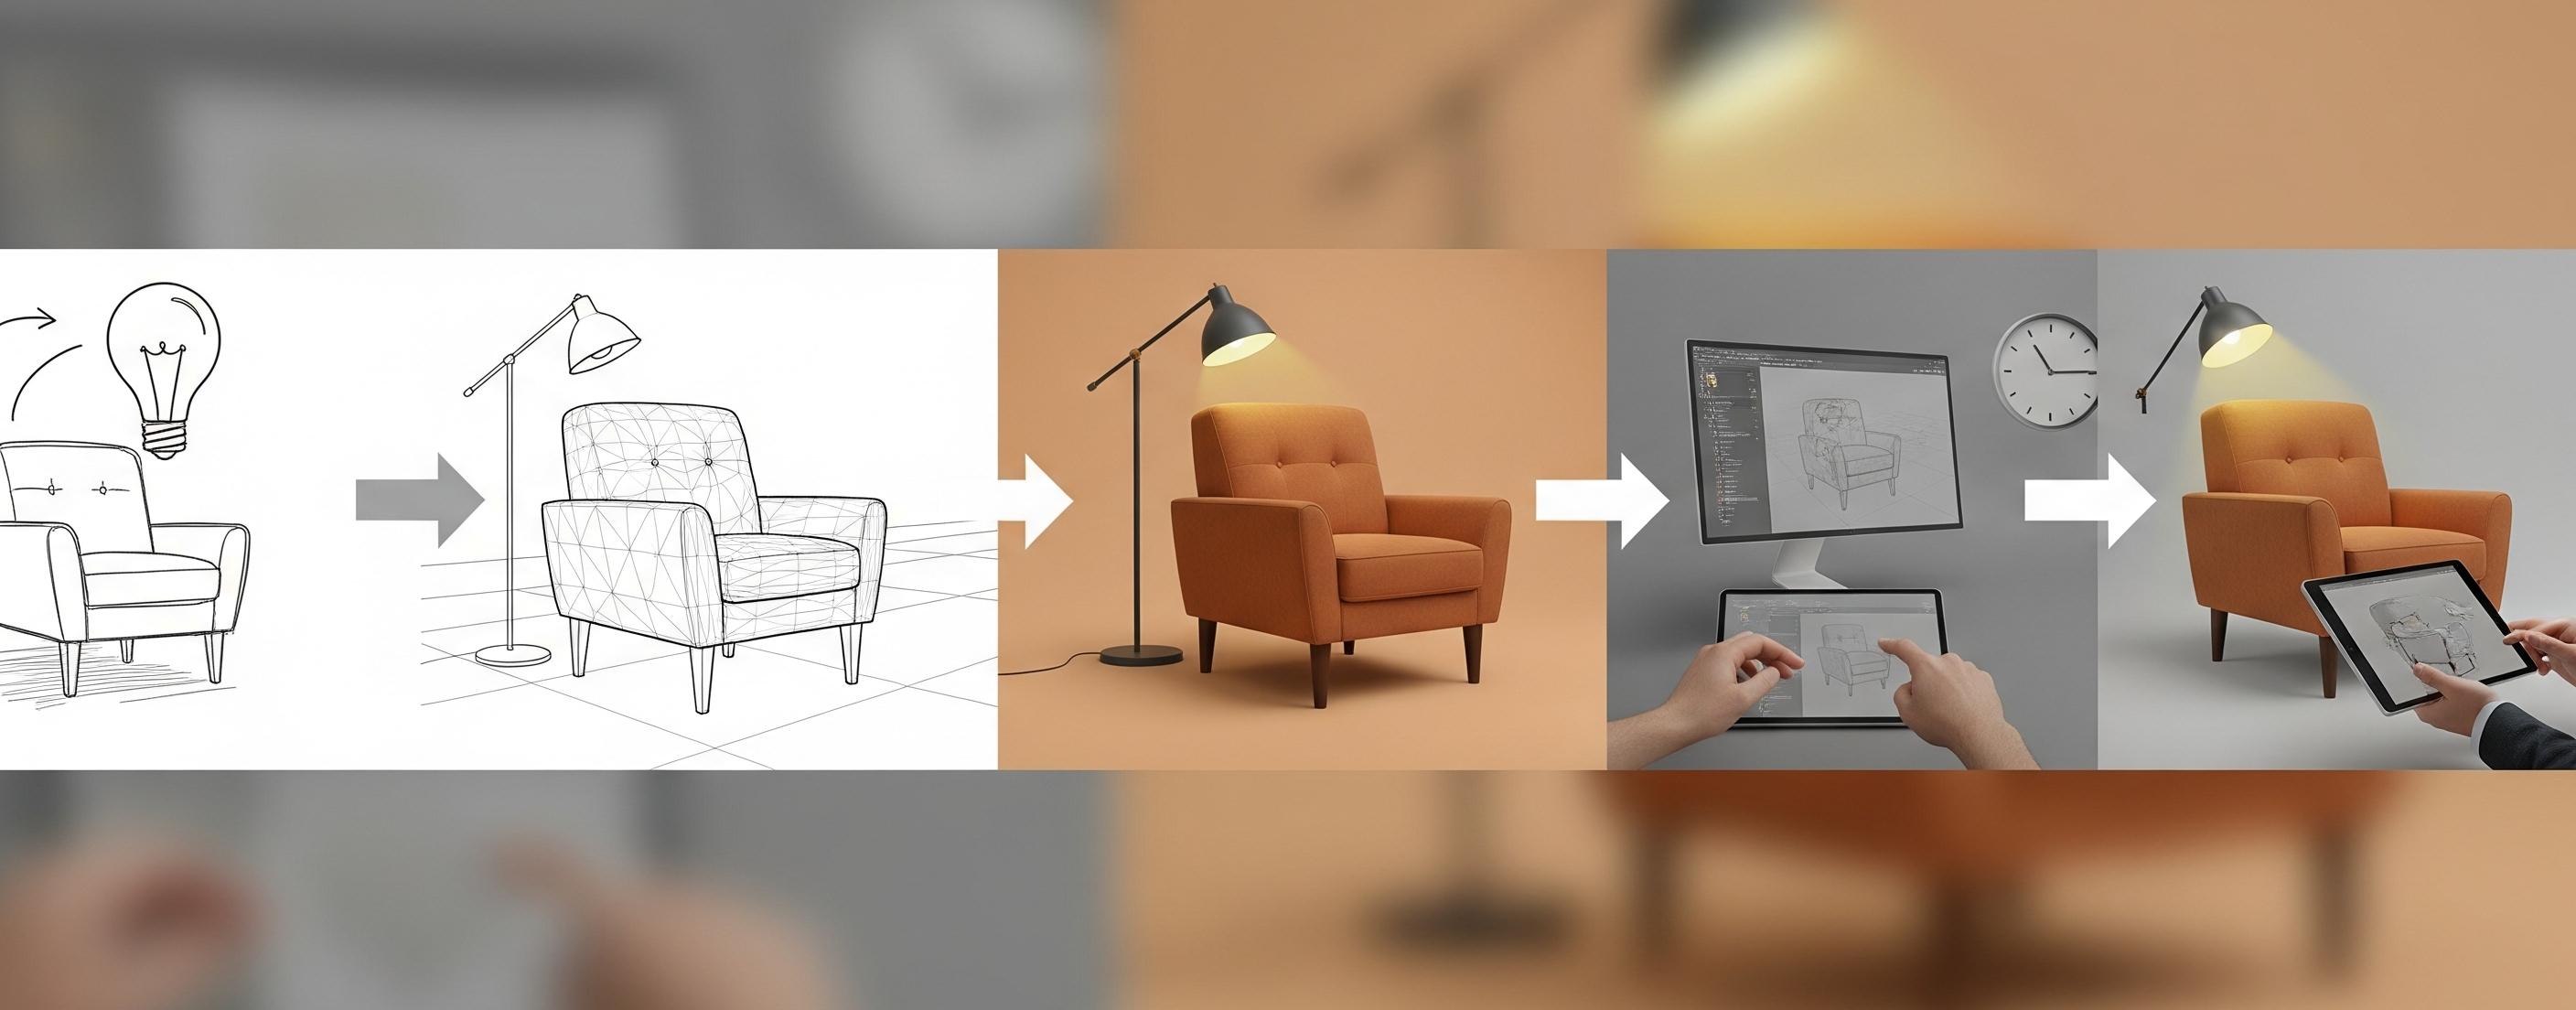
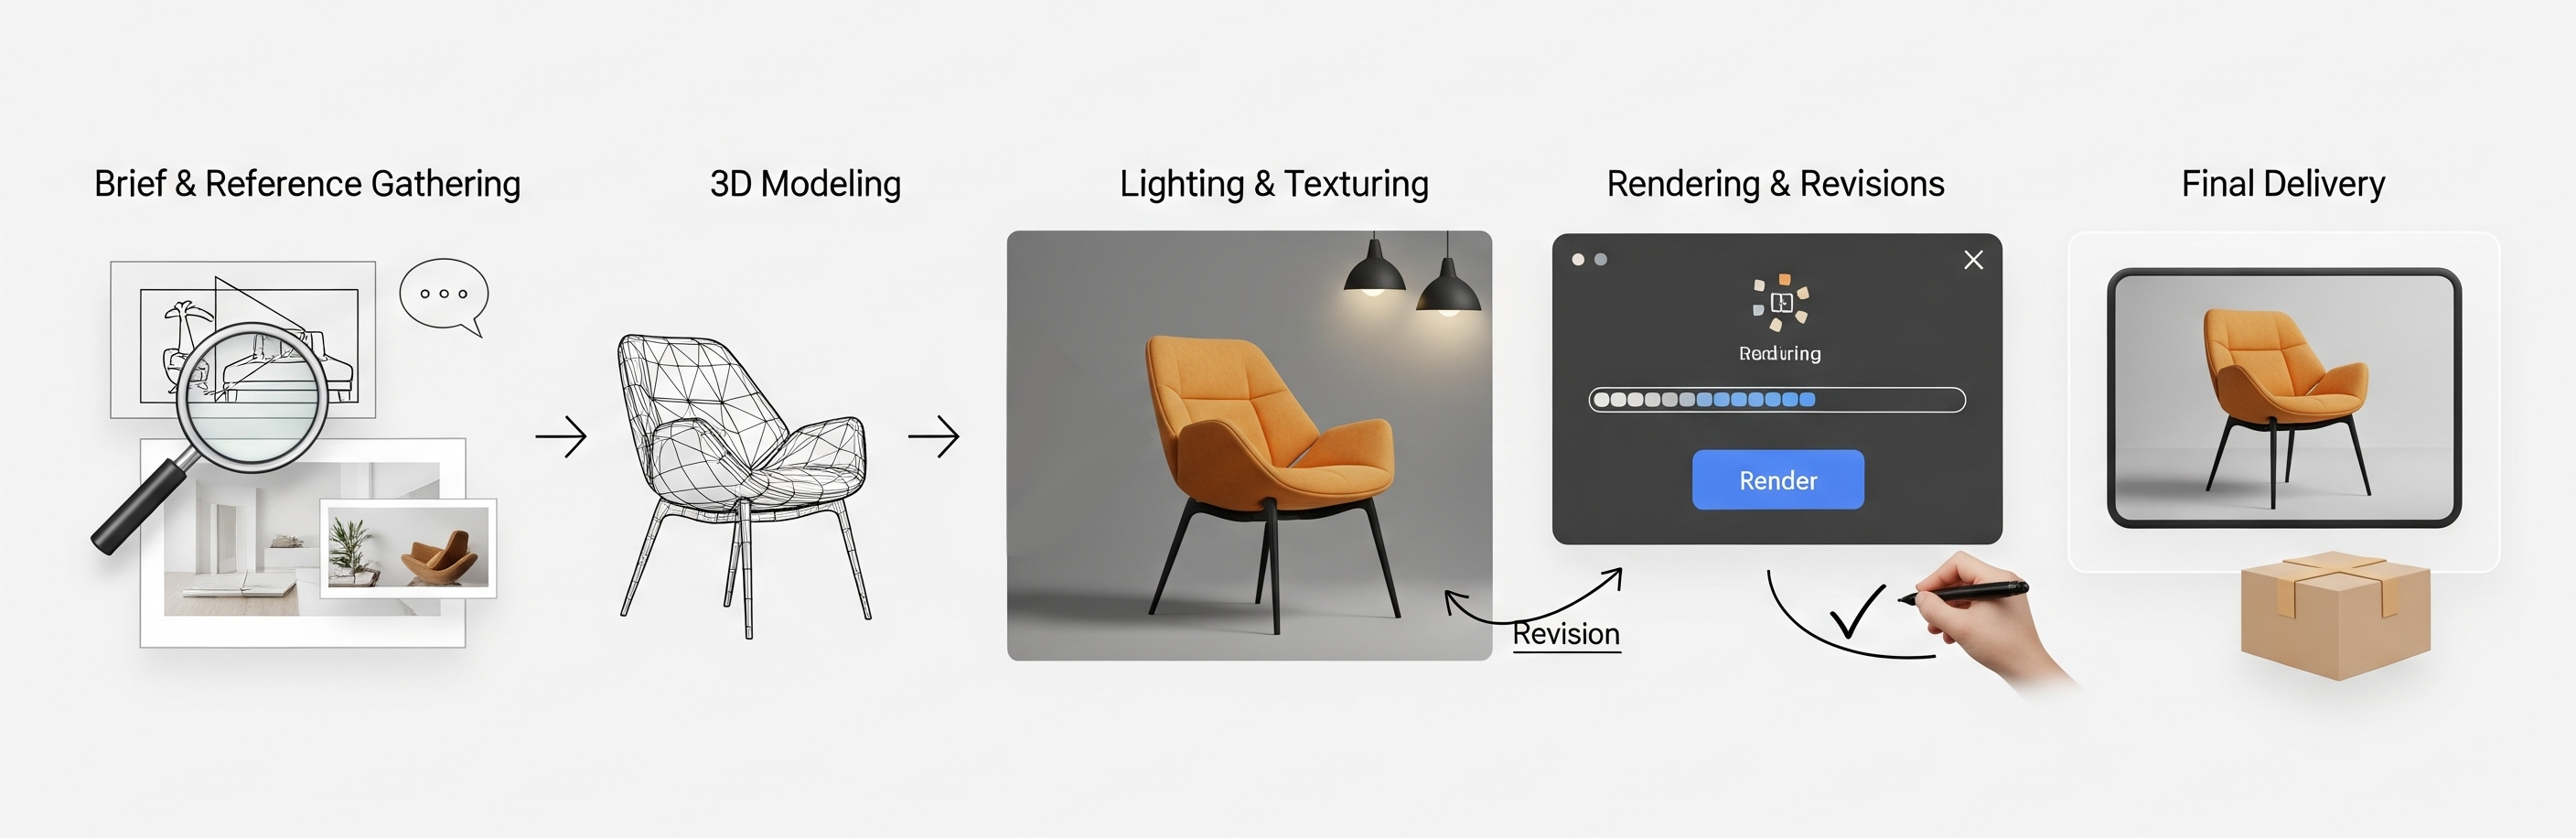
Step 3: 3D Modeling (From Scratch or Remodeling)
If you don’t already have a 3D model, we’ll build one based on your references. Our 3D modeling focuses on:
- Clean topology and geometry
- Accurate proportions and scaling
- Matching every detail—curves, seams, stitches, joints, and piping
If you already have a CAD or mesh file (like FBX, OBJ, or 3DS), we can remodel or optimize it for visualization, ensuring it’s UV-unwrapped and ready for high-quality rendering.
We specialize in furniture modeling, so we’re familiar with both hard and soft surface modeling techniques—including sofa cushions, rattan textures, metal tubing, and wood joints.

Step 4: Texturing and Material Creation
This is where the magic begins.
We create custom, realistic textures and apply them to your 3D models. Whether it’s oak woodgrain, matte black metal, velvet, or aged leather, we know how to achieve the perfect surface detail using:
- PBR texture workflows
- Bump, normal, and displacement maps
- Custom UV mapping to ensure texture precision
Our aim is to match your real product as closely as possible—or even visualize new finishes you haven’t prototyped yet.

Step 5: Lighting and Scene Setup
Lighting is what separates average renders from photorealistic ones.
We choose the best lighting setup based on your product’s character and the purpose of the image. That may include:
- Studio-style white background with soft shadows
- Realistic HDRI lighting for natural sunlight
- Environment-based lighting for lifestyle scenes
For lifestyle or room renders, we can also build custom sets to showcase your furniture in real-world contexts—like a Scandinavian living room or a cozy loft.
Step 6: Camera Angles and Composition
Next, we define the best views to highlight your furniture’s design. This may include:
- Front view
- Perspective angle
- Close-ups of material/texture details
- Top-down or side view (for catalog use)
We offer you a set of draft angles for review. You can request changes here before we move to final rendering.
Step 7: Draft Render and Feedback Loop
We generate low-resolution drafts so you can evaluate:
- Model accuracy
- Textures and materials
- Lighting and shadows
- Camera composition
This is your chance to request revisions. We offer unlimited minor changes at this stage to make sure you’re completely satisfied before rendering high-res versions.
Step 8: Final High-Resolution Rendering
Once everything is approved, we render your visuals in full resolution, typically:
- 4K for hero shots and catalogs
- 2K+ for web and eCommerce
- Transparent background or environment (as needed)
Post-processing is applied for final polish—color balance, contrast, noise reduction, and sharpness.
Step 9: Delivery of Final Assets
We deliver your assets in your preferred format, typically including:
- High-res JPG or PNG
- Optional transparent PNG
- 3D source files if requested (.MAX, .OBJ, .FBX, .GLB)
- Any custom formats for your platform (Amazon, Shopify, Wayfair, etc.)
We also keep backups of your project files for future updates or re-renders.
Step 10: Post-Project Support & Repeat Collaboration
Our work doesn’t end with delivery. Many of our clients return for:
- Rendering the same product in new colors or scenes
- Creating animations or 360° views
- Building complete furniture catalogs
- Customizing the same assets for AR use
We believe in building long-term partnerships, and that’s why we prioritize responsive communication, fast edits, and support even after project delivery.
What Information Do Rendering Artists Need?
Creating accurate and realistic 3D furniture renderings starts with having the right project information. The more details provided at the beginning, the smoother the production process and the more closely the final renders will match your expectations.
Most furniture rendering projects require some combination of the following:
- Technical drawings, CAD files, or product dimensions
- Sketches, reference images, or concept designs
- Material and finish specifications
- Fabric, wood, metal, or color references
- Required render angles and camera views
- Intended use of the renders (eCommerce, catalog, marketing, advertising, etc.)
- Desired image resolution and file format
- Reference examples that show the preferred visual style
For existing products, manufacturers often provide CAD models or production drawings, allowing artists to create highly accurate 3D furniture models. For products still in development, sketches and reference images can be used to build the model from scratch.
Providing clear information early helps reduce revisions, improve visual accuracy, and ensure the final furniture rendering aligns with both design and marketing goals.
Why Our Clients Love Working With Us
✅ Fast turnaround without compromising quality
✅ Detailed, accurate modeling—even from sketches
✅ Expertise in high-quality UV texturing
✅ Transparent pricing and process clarity
✅ Strong communication and project updates
We’ve worked with furniture eCommerce brands, architectural studios, and product design teams around the world to deliver renders that aren’t just realistic—they’re market-ready.
Let’s Bring Your Products to Life
By now, you’ve gone through the full 3D furniture rendering guide and seen how each stage contributes to creating accurate and visually strong product images.
At 4dviz Studio, we combine technical precision with creative flair to produce 3D furniture rendering that helps your products sell faster, look better, and reach more people. Whether you need 5 product shots or an entire catalog visualized, we’re ready to help.
📩 Contact us today for a custom quote and let’s turn your furniture designs into stunning 3D visuals.
FAQ
Question: What is 3D furniture rendering?
3D furniture rendering is the process of creating photorealistic or stylized digital images of furniture using 3D models, materials, lighting, and rendering software. Furniture manufacturers, retailers, designers, and eCommerce brands use these renders to visualize products before production or photography.
Question: What files are needed for a furniture rendering project?
Most furniture rendering projects require CAD files, technical drawings, dimensions, sketches, product photos, material references, or concept designs. The more detailed the source information, the more accurate the final render will be.
Question: How long does a 3D furniture rendering project take?
Project timelines vary depending on product complexity, the number of furniture pieces, render views, revisions, and image resolution. Simple projects may take a few days, while large furniture collections or lifestyle scenes can take several weeks.
Question: Can 3D furniture renders replace traditional product photography?
In many cases, yes. High-quality furniture renders can be used for eCommerce stores, catalogs, advertising, product launches, and marketing campaigns. They also allow brands to visualize products before manufacturing or photography is possible.
Question: What industries use furniture rendering services?
Furniture rendering services are commonly used by furniture manufacturers, retailers, eCommerce brands, interior designers, product designers, architects, marketing agencies, and home décor companies.
Question: Why is 3D furniture rendering important for eCommerce?
3D furniture rendering helps eCommerce businesses create consistent product visuals, showcase multiple finishes and color variations, reduce photography costs, accelerate product launches, and improve the online shopping experience for customers.