Details really matter in the life of 3D furniture rendering. From geometry to lighting, it all adds up together and produces a perfect realistic and believable visualization. But one spot that makes a big difference is in texturing. Adding intricate textures can bring your bare-bones 3D-rendered furniture to life-like levels and give you those really killer details.
This would be one of the most crucial steps, through thousands of projects on furniture rendering services, for drastically influencing an outcome. I’ll go through why texturing is so important, some common errors to avoid when painting textures, and how you can approach decent results.
What is Furniture Rendering?
Furniture rendering is the process of creating detailed, realistic visual representations of furniture designs using computer graphics software. This technique is essential for designers, manufacturers, and marketers to showcase products in a visually appealing way, allowing potential buyers to see how the furniture would look in various settings.
Texturing Importance in Furniture Rendering
Furniture is everywhere; we learn the feel of a varnished table, a plumped cushion, and the detail on an oak grain. Of course, these characteristics drive creating convincing 3D visualization for furniture that viewers will find appealing when we model furniture in 3D.Of course, texture; we all know how important it is-just see this result.
Materials Drive Realism
The creation of textures that allows a 3D furniture rendering to appear realistic. Every material-wood, leather, or metal-has its specific properties, such as glossiness, roughness, and reflectance. Proper recognition of these properties allows the viewer to identify the material right on sight. Once I start working with render passes of furniture made of wood, for example, it should yield the natural pattern and finishes in the wood furniture. Even within the same colour, due to the way light bounces, a glossy oaky table looks nothing like an unfinished pine chair. Without the right texture, the model seems dead because it does not carry any sense of how that material should feel under force.
Making an Emotional Bond
3D rendering furniture is far more common to stir emotion, like an artistic impression, whether for a quicker interior design project or another variant of e-commerce. The usually expected outcome is always how it clicks on our emotions. Texturing of furniture would provide a cozy, comfortable, or luxurious feel with material and color.
For me, there are textures that immediately connect those dots. A moderately wrinkled and soft fabric couch can remind one of their favorite hangout spot. A shiny dining table might scream ‘stylish and pricey’. It is these little emotional cues that tend to play the biggest role in influencing how a viewer feels about furniture.
Keeping Multiple Views in Sync
This is even more the case when making interactive or full 360º product renders. With proper texturing, no matter from what angle you look at a given material, it will appear consistent. An unaligned, stretched texture will break the charm and degrade render quality as a whole.
For example, I have had clients request a turntable view or 360-degree shots of some furniture. Here, proper UV mapping and proportionally scaled textures become more crucial. The second the model is up to viewing from any direction, an artifact of any kind will be extremely noticeable.
Avoid These Furniture Texturing Mistakes
They are working as hard as they could, but the texturing space is a place where even the most seasoned modelers can skid. Here are a couple of the pitfalls I have fallen into and some suggestions on how to avoid them:
Using Low-Resolution Textures
This is quite a common mistake that can spoil even the best-modeled furniture. Your model may look fine in 3D, but once you start seeing close-ups, the model becomes blurry and pixelated. Furniture is one of the most common types of things we all see being rendered either for marketing purposes or up close, so the texture responds to higher scrutiny.
How to avoid it:
Choosing high-resolution textures is important, especially for big areas like tabletops and upholstery. I usually use 2k or even 4K textures just to safeguard sharpness when the shots are at close-ups.
Incorrect UV Mapping
Poor UV mapping means stretched or deformed textures, especially on oddly shaped furniture pieces. This only means one thing: if not perfectly executed, it may kill the realism when, in fact, patterns should normally appear as such.
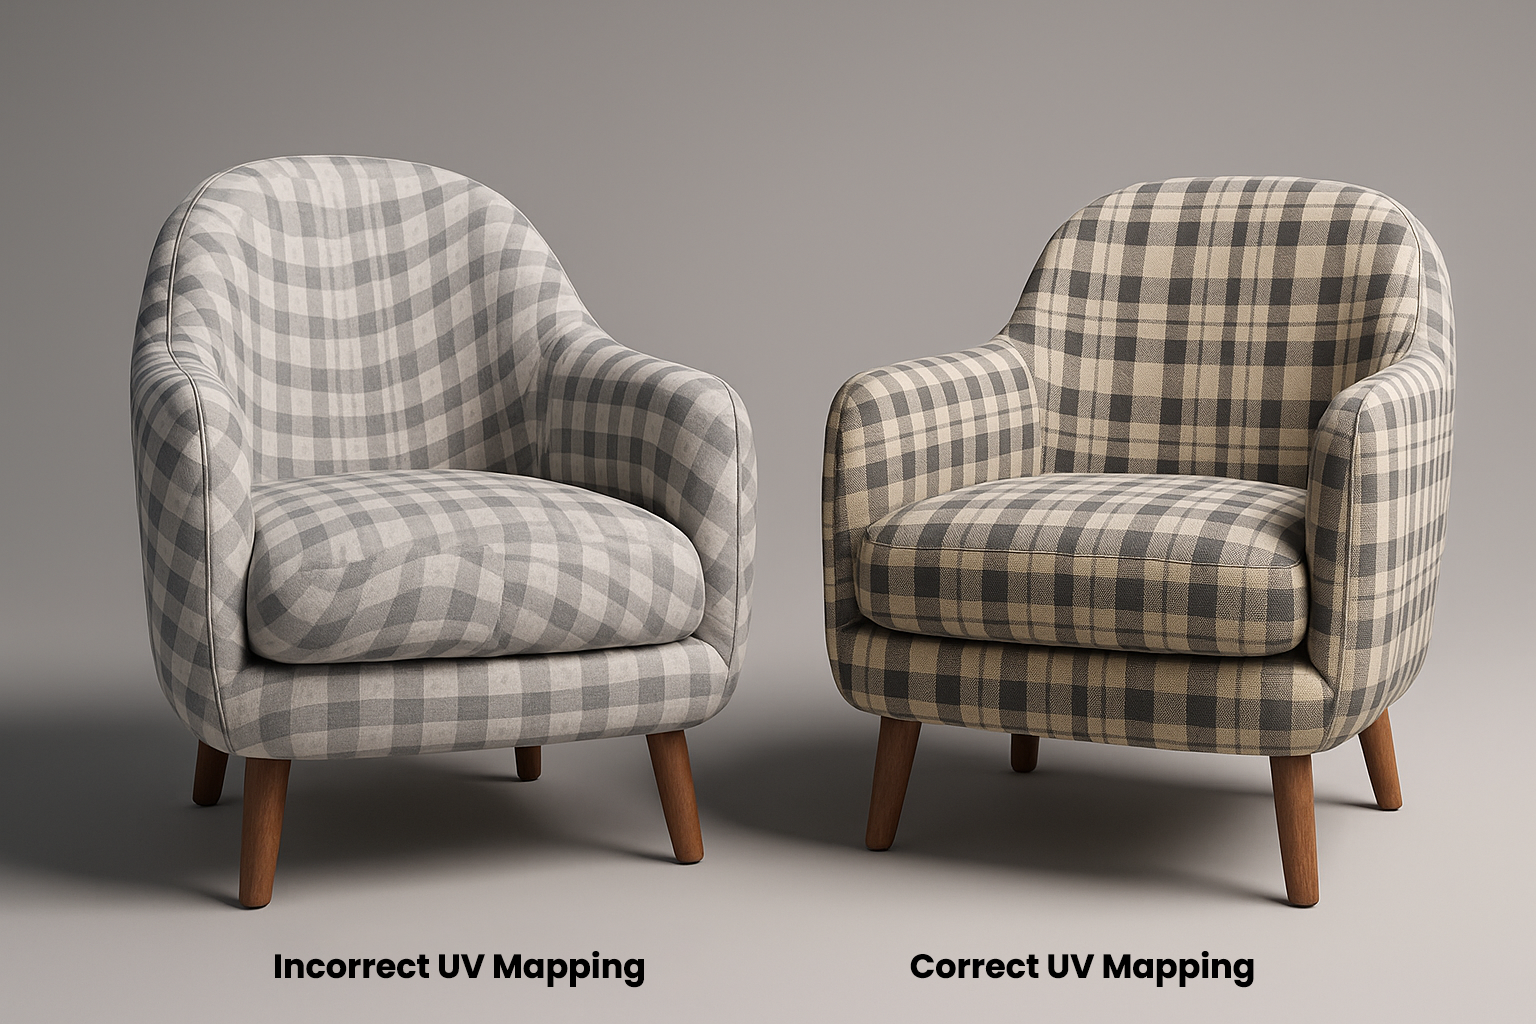
How to avoid it:
Unwrap and straighten up the UV layout if need be. Blender and 3ds Max have really good tools to do that but more often than not manual tweaks are needed. I did have one project with a striped fabric armchair and at first the stripes were warped in places. Adjusting UVs made for a texture that would pass for it.
Avoiding Normal and Bump Maps
Textures cannot give every angle and every little detail of certain materials. Wood grain or fabric weaves will almost always need additional maps to truthfully represent surface blemishes and details. Without this, surfaces become too clean or digital.
How to Avoid It:
Normal or bump maps will buy you some additional surface detail. These maps fake the imperfections without adding additional model complexity. On one project I added a bump map to some leather sofas to provide slight creases and texture that served to make color variances appear aged and realistic.
Not Setting Reflectivity and Glossiness (Chrome)
Different materials uniquely respond to light-wood reflects a certain amount of natural shine, while fabrics are mostly dull. The failure to do this step results in a render that doesn’t represent how materials will behave correctly.
How to Avoid It:
Refine the reflectivity and glossiness settings depending on the material used. On a shiny lacquered wood table, for example, I usually make it way more reflective than you’d ever see happening in real life. On a fabric couch, I just turn down the reflectivity and give it an extra dose of roughness to make it feel more organic.
Here are the Best Practices for Texturizing Furniture Renderings
With that said and having skimmed through some of the pitfalls of texturing in the production MRSJ for a high-level overview, what are some good practices that you could use to help level up your game in 3D furniture modeling and rendering services?
Quality Use of Texture
Invest in quality textures. Always buy high-quality textures or, if possible, create your own. Sometimes, an excellent texture stands between what is good and fantastic render.
For my own workflow, I combined free and paid resources to create an extended texture library that forms the backbone of all woods, metals, and fabrics. Having them in store will save your time and keep the coherence of all projects.
Trials for Procedural Textures
Image-based is the norm, but procedural textures give you control and flexibility for unique surfaces. And they can be customized in your 3D application for some fantastic dynamic textures that you want to have in control yourself.Even on a cabinet with a unique wood grain, I made each different and in tone with the actual piece of furniture using procedural textures.
Refer to the Real World
Well, it’s just priceless to observe how materials feel and behave in the real world. Observe how they shine, age, and feel to the touch. Using real-world references will help in the feeling of your furniture like they are lived-in and more believable in your 3D visualization.
When I do bespoke pieces, I usually ask my client for some samples of materials for us to study textures firsthand and make the digital version
seamless with reality.
Test Textures in Different Lighting Environments
One of the important things that can change how a texture will look is the lighting. Always test your textures in all the lights of the scene so that they look great from whatever angle.
In my last project, I noticed how some of the textures looked great under direct bright daylight and were dull with less light. If you test your textures under different light conditions, then they would look great whatever the setup is.
Texture, Texture and More Texture:
Texturing is the basis for realism. In the case of 3D furniture rendering, without realistic texturing, the best results cannot be achieved. Modeling is important, light too, but textures allow the viewer almost to “feel” material much more closely, connecting them with your scene.
From simple mistakes to finer details that slip away, avoiding these practices will come together in creating amazing renders that make a much bigger statement than the usual “oh, it’s just another render of this.” Doing good texturing is somewhat an art; with a bit of practice, this can enhance the quality of your furniture rendering services by a long shot.